How (and Why) To Optimize Images in Squarespace
So your site loads faster, looks professional, and is easier for people to find on Google.
In this post, I'm walking you through how to optimize your images in Squarespace — both why it matters and how to actually do it without pulling your hair out.
Images are a huge part of your website.
They help communicate your style, show off your work, and build trust quickly, sometimes even faster than words can.
But if you're not careful, they can also sabotage your site.
Here’s the issue: most people upload whatever images they were sent or downloaded, usually large files from a photographer or a stock photo site, without realizing they’re too big for a website.
And when your site is swollen with oversized images, it loads slower, frustrates visitors, and gets flagged by Google.
Image optimization means making your image files smaller and more functional… without making them look terrible.
When you optimize your images:
Your pages load faster
Visitors are more likely to stick around
Your site is easier to find in search results
Everything runs smoother, even on mobile or slower internet
I’ve worked on so many Squarespace sites where simply fixing the image setup made everything feel cleaner, faster, and more aligned.
So whether you're starting from scratch or refreshing what’s already there, here's exactly how to optimize your images the right way.
What does “optimize your images” really mean?
It’s not complicated, but it does take intention.
Optimizing images means:
Making the file size smaller so your site loads quickly
Using the right format so photos stay clear and don’t look pixelated
Renaming the file so search engines know what’s in it
Adding alt text so your site is accessible and more likely to show up in search
It helps your website work better. It helps people find you. It keeps things polished & profesh.
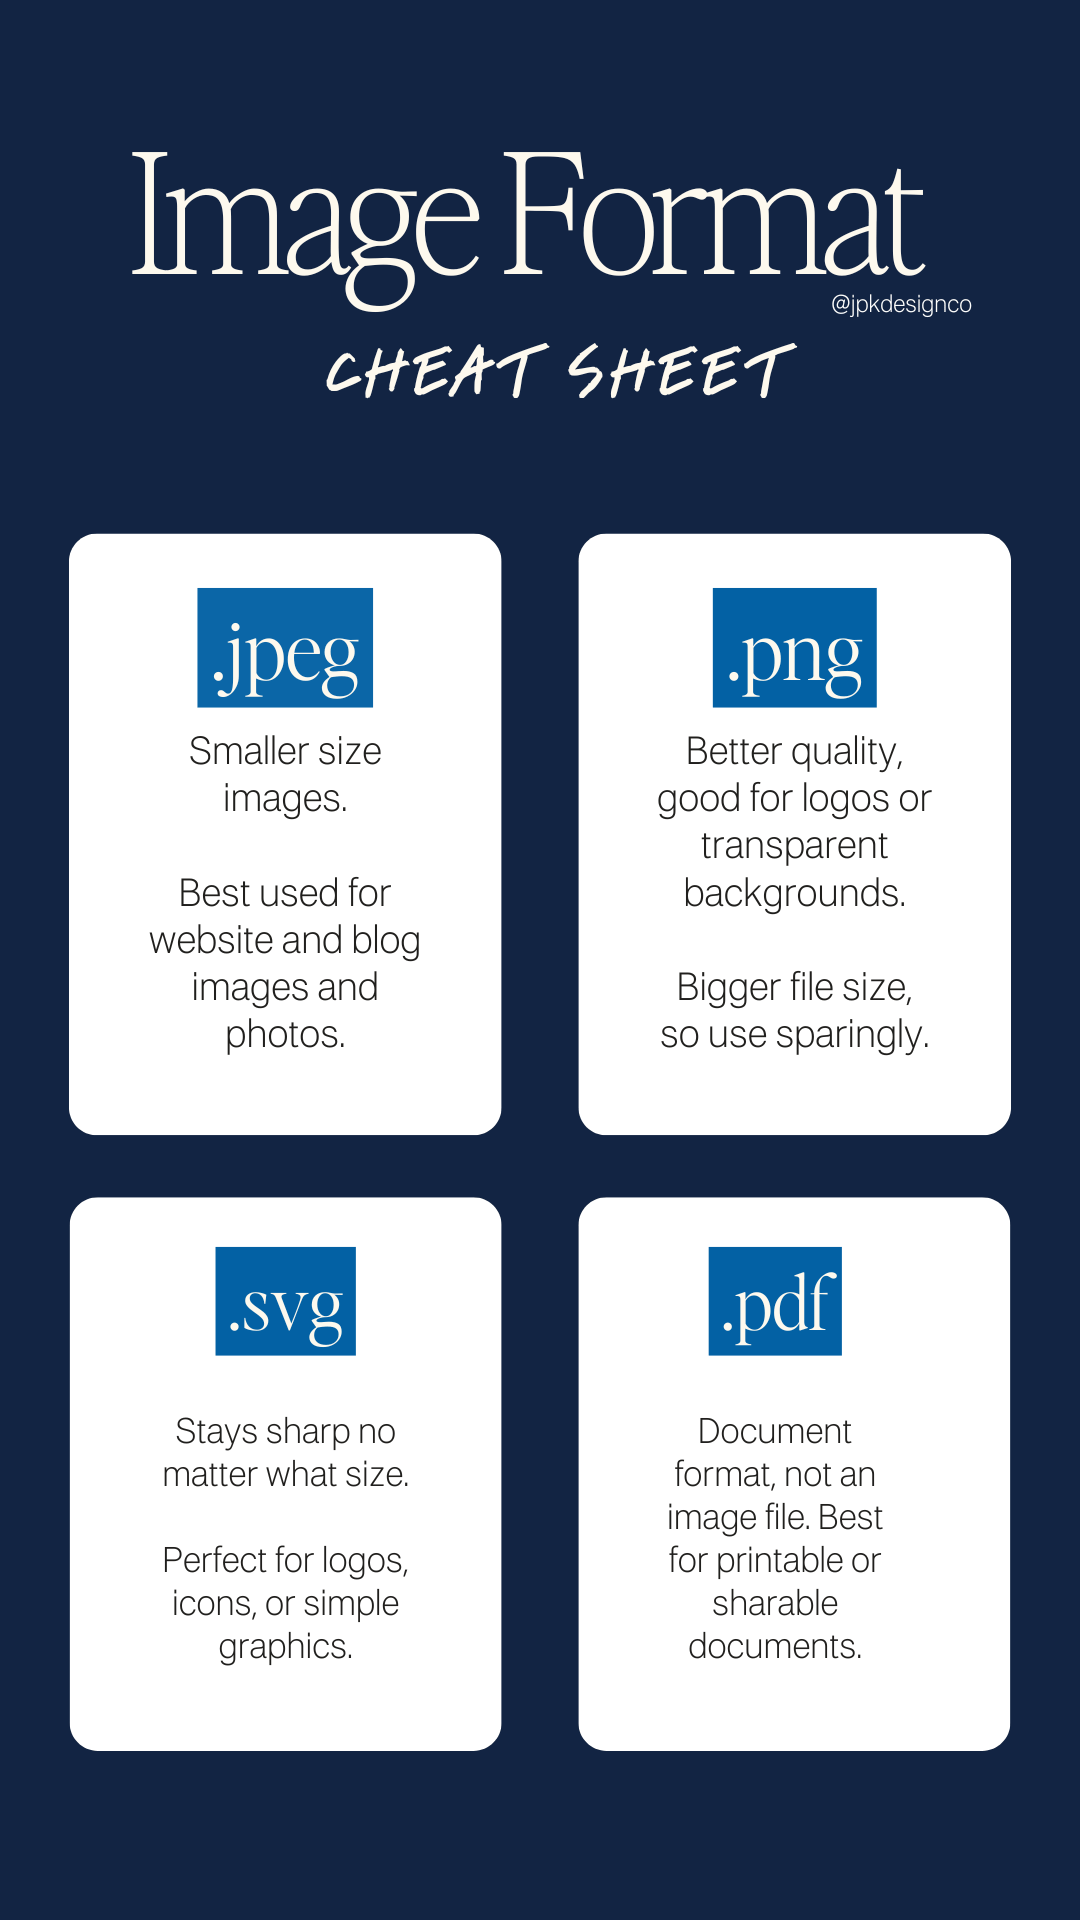
01. Choose the right format
Here’s a quick breakdown on how to choose the right image format for your Squarespace website.
JPEG - usually lower quality than a PNG, but it’s smaller size, and typically the best choice for your website
PNG - high quality but typically larger than a JPEG. You want to use PNG for any transparent images (ie logos)
SVG - great for logos and icons that need to be scaled without using losing quality. Large in size. Use sparingly.
✍️ TIP: If you’re using Canva, I’ve found that if you download the original image or graphic as a PNG, and then convert to JPG and resize, the image quality tends to look crisper.
02. Resize your images before uploading
This is one of the most common website mistakes I see: uploading huge images straight from a phone, camera, or Canva export.
Here’s what to do instead:
Resize the longest side to 1500 pixels or less (or up to 2000 pixels for banners)
Keep the file size under 500KB
If you can keep it under 250KB without losing clarity, even better
This keeps your images looking sharp without slowing down the site. Blurry, stretched, or pixelated images don’t reflect your brand , and slow-loading ones frustrate your visitors before they even read a word.
Tools to Resize and Convert Your Images
Not sure how to shrink or reformat your images before uploading? These tools make it easy, whether you’re on a Mac, PC, or just want something simple in your browser.
🖥 For Mac
Preview (already built in)
Open your image, go to Tools > Adjust Size, and enter your dimensions. Quick and easy, no extra downloads needed.
🖼 For Windows
Paint (also built in)
Yep, the classic. Open your image, click the three dots to find resize, choose your dimensions or size, and save. Works great for basic adjustments. (This is what I use 90% of the time!)
🌐 Online Resources (works on any device)
Squoosh
Drag in your image, adjust the size and format, and download the optimized version. It’s simple and gives you a real-time preview so you can tweak without guessing.TinyPNG
Great for compressing PNG and JPG files. It keeps your images looking clean while dramatically reducing file size.Pixresize
Created by Rache at Squarestylist, Pixresize is built with website owners in mind. It runs entirely in your browser, so your images aren’t uploaded or stored anywhere. You can resize, convert, and prep your photos while keeping everything secure and private.JPEGMini
I just learned about this one. This one does have a one time fee, but I’ve heard it’s great. If you are just doing your own website photos once, it’s probably overkill, but if you have clients this could be a great option.
🧰 Other Tools
Adobe Photoshop
If you already use Adobe, you can resize and prep images for web inside Photoshop. Go to Image > Image Size, adjust your width and resolution (72 PPI is standard for web), and save as a JPG.Adobe Express Free Image Resizer
A good free option if you don’t use Photoshop. Upload your image, pick the size you want, and download it ready to use.
03: Rename your image files
And before you upload anything to Squarespace, ideally while you’re resizing, give the file a name that’s specific & helpful for you to stay organized.
Bad: img_9375.jpg
Better: Wild-Bloom-Events-Portland-Wedding-Planner-Outdoor-Ceremony-2025.jpg
Use hyphens instead of spaces or underscores. Add keywords like your name, business, location, and what’s in the photo.
This helps search engines understand your content and can even help your photos show up in Google Image Search… which is free visibility for your business.
✍️ TIP: Uploading multiple photos in a set? Add a number or short variation at the end to keep each file unique (+1, -b, etc)
04: Add alt text
Alt text is a short description of what’s in the image. It shows up for screen readers (used by people with visual impairments), and it also helps search engines understand your site.
In Squarespace, here’s how to add alt text to your image:
Click the image block
Click the pencil/edit icon
Scroll down to “Image Alt Text”
Write a few words or 1-sentence description of the image
Click save
Example: “Minimalist home office with wood desk, linen chair, and open laptop by a window”
Keep it specific and natural. Don’t try to cram in keywords. Just describe what’s there, clearly and respectfully.
AUGUST 2025 UPDATE: Squarespace recently released a built-in new AI tool to handle ALL of your alt text for images in one easy spot. Head to Settings —> Marketing —> SEO Appearance. You’ll see Your SEO Completion Score, then “Improve with AI”.
Follow the steps to complete alt text for all your website images. It’s super fast and makes a huge difference on your site.
Why this matters, even when your site isn’t live yet
When your images are optimized:
Your site loads faster
Visitors stay longer and bounce less
Google can better understand your content
Your business looks more professional and intentional
It’s easier for people with vision impairments and/or using screen readers to understand your content
This is true whether you’re launching your first site or improving the one you’ve had for years. Good images make a big impact, and optimized images make sure they’re pulling their weight.
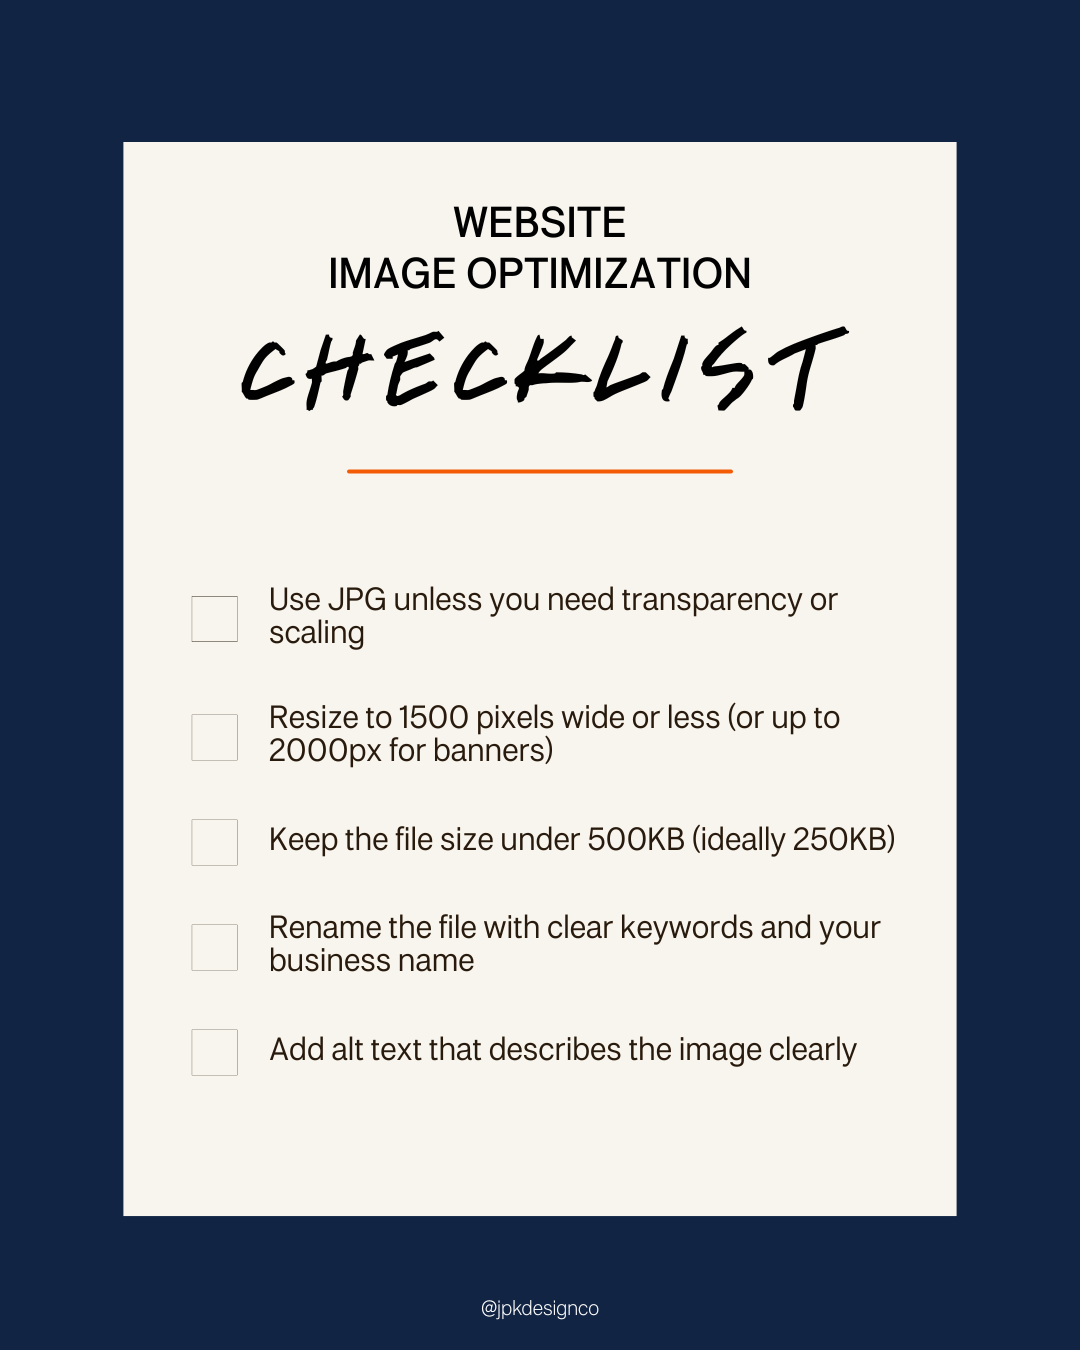
Image Optimization Checklist
Use this before uploading any image to Squarespace:
Use JPG unless you need transparency or scaling
Resize to 1500 pixels wide or less (or up to 2000px for banners)
Keep the file size under 500KB (ideally 250KB)
Rename the file with clear keywords and your business name
Add alt text that describes the image clearly
If you only do one or two of these steps, your site will already run better than most.
And if you do all of them consistently, your website will be faster, cleaner, and easier to find.

